Researching the place you’re going to is the first and most important step for travel photographers. However, most of the content you’ll find will tell you how to get the exact picture you saw on Flickr or Instagram of that exact place.
We at spotted by locals have a very different approach! How about getting off the beaten track in photography?
This guide is about the lesser know, hidden gems of photography. As a Brussels local and photographer, I want to show you those spots you only know after plenty of on-site research, endless exploring, and a ton of hours trying to get the best out of my camera.
Note: This guide is mainly written for people with a camera with manual settings. However, I made sure these tips can be used with a compact camera or with their mobile as well!
Also, sometimes I included a bit more technical tips and notes. There, you’ll find links to photography blogs explaining the concept in detail, in case you don’t know it already or want to learn more.
Happy reading!
Lanscapes & Minimalism at Parc de Forest
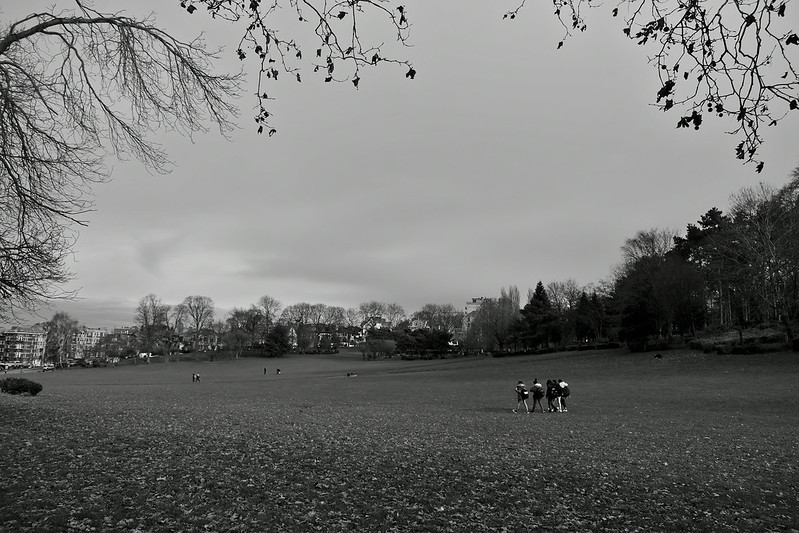
Image by Maria Alice Ferigo
What I love about Brussels is that it’s a very green city, with plenty of parks and nature. If you’re a photographer, this means that you can take some very interesting landscape shots right in the city. What’s even better is that compared to shooting in remote locations, in city parks you have people interacting with the environment. This adds a lot to the image and makes it way more interesting than an empty space.
Parc de Forest, which forms a green bridge with Dudenpark in Saint-Gilles, is an ideal spot. It’s big enough, very easy to reach, and a bit hilly which makes for nice, curved shapes. Also, you can include the big trees to have some contrast with small human figures.
I recommend you get here anytime that is not midday, as the harsh light is not very flattering. Also, colors are in my opinion the least impressive part, especially if your shooting in colder months, so I would suggest shooting black&white here. Bring a more versatile zoom lens, like an 18-55mm or 24-70mm, to take advantage of all the possibilities. A tripod is not strictly necessary but comes in handy especially in low light situations.
My favorite way of taking pictures in parks is a bit more on the minimalist side. First of all, I compose the photo as a landscape, using the huge fields to have lots of negative space. Then, I’ll wait for people (that are far enough to look small), to enter the frame and be in a position that fits the rest of the composition. In the pic above, for example, I waited for the group of kids to be in a position that fits the rule of thirds.
Art Nouveau in Marollen
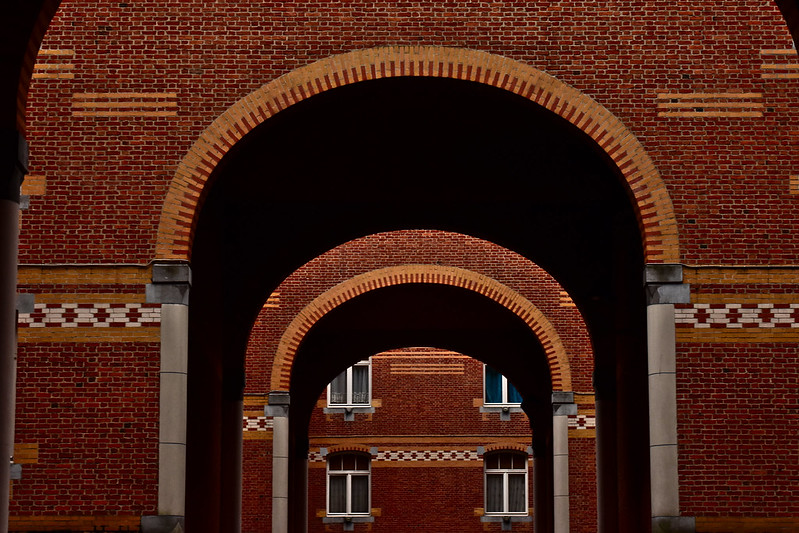
Image by Maria Alice Ferigo
Marollen is definitely my favorite neighborhood in Brussels, especially for taking pictures. It’s now getting more and more popular as a place where to spend a Sunday afternoon. The vintage shops and the Marollen flea market, indeed, makes it a good spot for treasure hunting – and for taking pictures.
However, a lesser-known very interesting spot for photography is Cité Hellemans, just a few steps away from the flea market. Now, to begin with, a warning: this is an apartment buildings complex, not a tourist spot. So if you’re going there to take pictures, please show a maximum of respect for those living there, and in any case, avoid photographing people in their homes or yards without their permission.
This being said, the complex dates back to 1915 and was built to be used as social housing. The interesting part is that it’s all built in a perfect Art Nouveau style. If you know Brussels, you know it’s famous for Art Nouveau, but tourist guides usually bring you to the Mont des Art or maybe Etterbeek for it.
However, I especially like Cité Hellemans because it’s a huge complex built in a very regular, repetitive way. When you enter it you’re almost overwhelmed by the tall buildings! It’s one of my favorite spots for architecture photography, as you can really take advantage of the repetition of similar-looking alleys and impasse to give your photo a very minimalist look.
I’d advise you to come here when it’s cloudy (in order not to have harsh shadows), but around midday to have proper lighting as it’s a bit dark inside the alleys. If you want a minimalist look, like the one in my picture above, I’d suggest bringing a longer focal length lens to get more compression and give a more bidimensional look to your photo. I shot my picture at 55mm, but if you can shoot at 70mm or even 85mm, that’s probably better.
Lights & Shadows in Trone
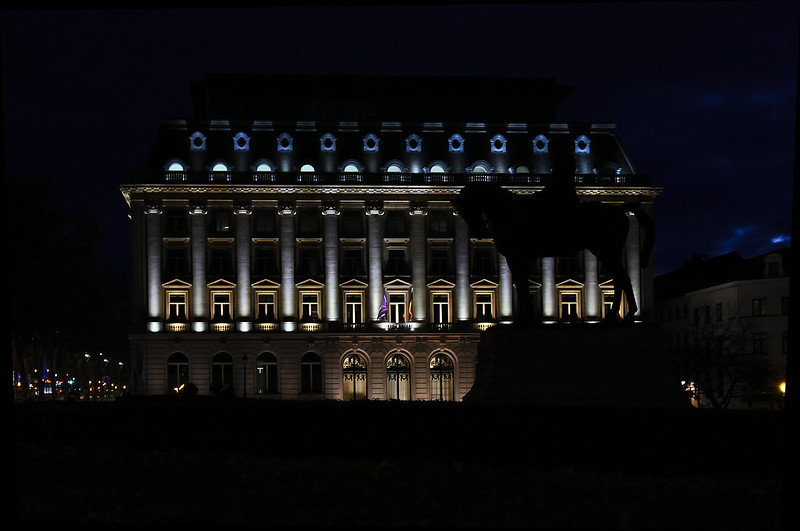
Image by Maria Alice Ferigo
“Trone” is, basically just a metro stop on the road between the city center of Brussels and Place Luxemburg (where the Parlament lies). If you get out of the metro here at night, however, you’ll discover some very cool light shows on the facades and windows of most buildings on the main road.
Obviously, this offers plenty of opportunities for cool night photography of buildings. A tip: you can not only play with lights but with other dark elements as well, as I did in the picture above. It’s basically a revisitation of the classic “silhouette at sunset” photo. The difference is that here, your light source is the building’s lights instead of the sun. As you have light in front of the camera, the subject in the foreground will be completely dark.
It’s better to use a tripod in order to be able to keep ISO low and use a longer shutter speed. This is necessary as you’ll need a smaller F-number to keep all the elements in focus. Indeed, I suggest not going for a bokeh, as the interesting part is actually the shape and style of the buildings. To get a nice picture that doesn’t look too chaotic, try to keep space (sky and streets) around the building to frame it better.
Blue Hour Lights at Gare Centrale
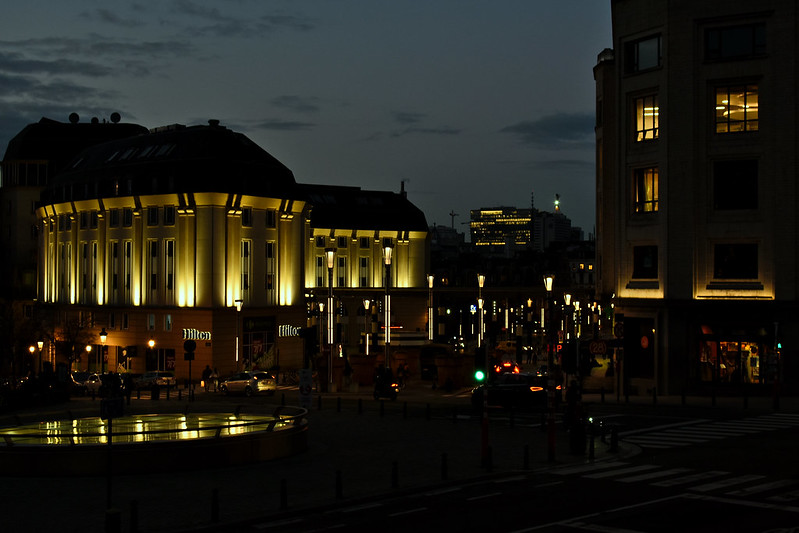
Image by Maria Alice Ferigo
Placed between the two most famous sights, Mont des Arts and Grande Place, Gare Central (the central train station) is usually nothing more than an easy to find meeting spot when hanging out with your friends. What most people overlook though, is the architecture of the station itself and of the buildings around it. At night, the light show here is really beautiful.
What I truly recommend, is that you don’t come here too late, but perfectly in time for the blue hour. That’s that time just after sunset when the sky is deep blue, but not completely dark yet. It’s a great time for photography because you can have stunning lights and a darker mood but still see the sky and clouds. If you’re up to it, check the current sunset times first. The blue hour doesn’t last long!
As the light after sunset changes very quickly, you need to plan out your shot and come early to study the place and choose what to shoot. My favorite place is at the beginning of the Park of the Mont des Arts, on the PleinPublik restaurant terrasse. You get an elevated viewpoint and a quiet corner to put your equipment.
As for the equipment, I suggest bringing a wide-angle lens (I went for a 35mm fixed lens) and possibly a tripod (especially if you can’t keep your F-number too low, or your ISO too high). You need to be extra careful with composition, so as to avoid having big dark areas or too much light in one or the other side of your pic. Balance is key here!
Street Photography in Place Jourdan

Image by Maria Alice Ferigo
Place Jourdan, in the so-called “European Quarter” (i.e. where the European Parlament and Commission lie), is very popular among locals to chill, have a drink and let the kids play. Since the main touristic highlights are a bit further away, you won’t find a lot of tourists here as well. This makes it one of the best spots in Brussels for street photography.
I recommend you get there on a weekend, late morning or early afternoon. You can choose to come in the evenings as well, but be careful because to shoot street photography (which means, moving subjects) you need a faster shutter speed. So, make sure your camera can handle higher ISO to compensate for exposure, as you won’t be shooting wide open! Any season is fine, albeit probably late spring and summer are when you will see more people.
Here you have two shooting options. The classical one is using a lens with a longer focal length (70mm or longer), to discretely take close-up pictures. Then, find a spot with a nice view, make sure the sun is behind you, and look for interesting scenes. Needless to say, do not take pictures where people are clearly recognizable (like portraits) without their permission!
Otherwise, and that’s what I did to shoot the above picture, you can shoot on a wide-angle lens. This kind of technique will suit you best if you’re shooting on mobile as well. As you will have a wider angle of view, you’ll need to make sure the image doesn’t get chaotic. How? The trick is to keep a background element that takes up at least half of the picture and is parallel to your lens. Then, everything else that happens in the photo will give an idea of movement and energy but will look tidy and clean.
The Bike road following the Brussels-Charleroi canal
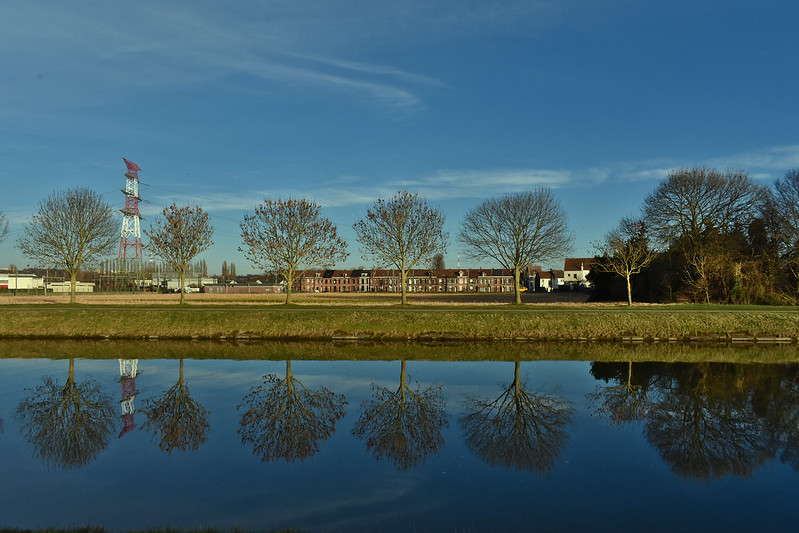
Image by Maria Alice
A very little known green gem of Brussels is its bike road. This bike road follows the canal that crosses Brussels from north to south and stretches into Wallonia to the city of Charleroi.
The southern stretch in the capital (entering from Curghem) is the most interesting photography-wise. Indeed, you’ll be immersed in a green, wide area, with rows of trees following the path and some typical Belgian houses here and there. I recommend getting here on a bright sunny day. I’d advise you to choose the early spring months and afternoon hours to have bright, not too harsh light. Summer is fine as well, but then you’d better get there in the early mornings or sunset hours.
This place is perfect for landscape photography. For composition, try experimenting with leading lines, using the canal to give direction to your photo. Water can also be used for symmetry if you include a reflection of your subject in your photo. In this case, it works very well to photograph rows of trees and houses across the canal. If you’re into minimalism, the wide and flat fields, with the occasional windmills or houses, are perfect for it. You just need to get away from the main track and walk a bit into the fields to get the best shot.
I recommend a wide-angle lens for taking pictures here, either zoom or fixed, and if you have one, a polarizing filter is a great idea as well. Since you’ll be shooting in daylight, you won’t need a tripod; however, consider bringing one if you’re going for sunset pictures.
Urban Sunsets inMolenbeek
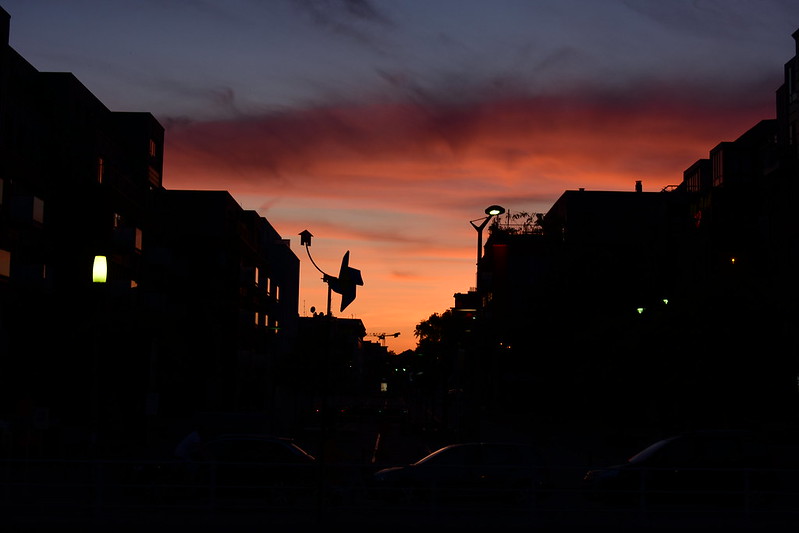
Image by Maria Alice Ferigo
Most sunset pictures of Brussels are taken from the iconic Mont des Arts, looking towards the city center. It truly is a stunning place, but I can’t help but recommend you explore other shooting locations as well. Next time, try walking straight from Mont des Arts through the city center until you get to the canal between Molenbeek and the city center.
Once you get to the canal, keep the city center behind you, and you’ll have the sun setting in front of you. So you can go for a classic silhouette at sunset shot, but make it more original and quirky with urban details, as I did with the pinwheel in my picture. Keep walking by the canal to get even more interesting scenes, graffiti, buildings, etc. Also, you’ll find several props.
I recommend a more versatile lens like 18-55mm or 24-70mm, to get both panoramas and close-ups. Again, a tripod can be useful, but not strictly necessary as you’ll need a darker picture anyway to get a silhouette. A tip, don’t come on a sunny day but go when it’s cloudy. Clouds create interesting shapes and colors that add something to the picture. Or take pictures when the sun comes out right after the rain, as the air is clear which makes for sharper pics, and wet objects reflect light.
Want to keep exploring the city? Check our locals’ favorite spots in Brussels!